Creating application demo videos with Playwright
When I recently built SyntaxRush, I wanted to create a polished demo video to showcase the gameplay and features.
My first thought was the traditional route:
- Screen record
- Edit clips
- Overlay captions
- Add logos
- Add background audio
- Export everything
In short… a lot of manual work.
Then I had a brainwave while running automated tests on another project — Playwright.
If Playwright can automate browsers, capture screenshots, and simulate user journeys… why not use it to generate demo videos automatically?
That’s exactly what I did.
Check out the repo on Github
TL;DR - I used Playwright to automate demo video generation, capture real user interactions, and combine everything with FFmpeg into fully branded marketing videos.
The Idea
Instead of screen recording manually, I:
- Built a Playwright spec file
- Mocked game states
- Captured videos at each stage
- Rendered slides with captions, logos and styling
- Used FFmpeg to stitch them into a video
- Added background audio and fade-out
The result:
- Smooth demo video
- Perfectly aligned captions
- Consistent branding
- No manual editing
- Fully reproducible
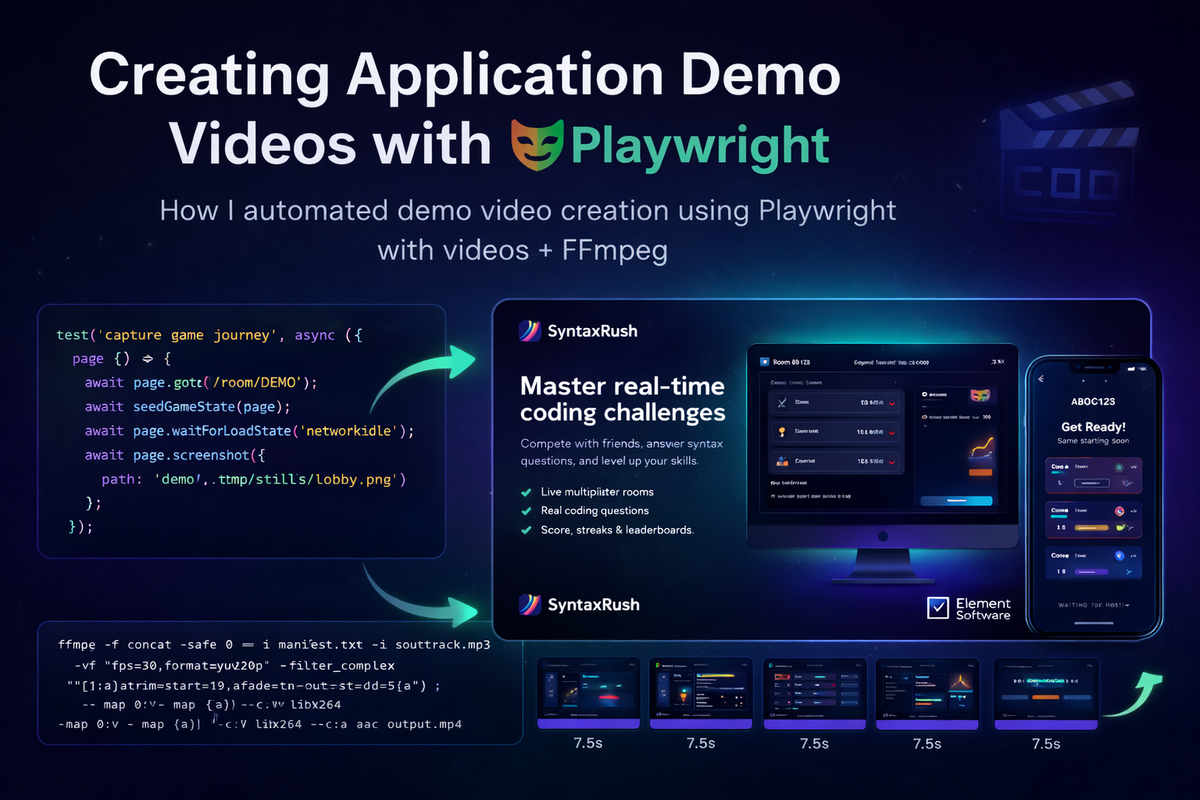
Step 1 - Using Playwright to Capture Application States
Rather than recording a live session, I defined state-based scenes and captured them individually.
Each slide contains:
- Title
- Subtitle
- Feature bullet points
- Desktop screenshot
- Mobile screenshot
From the spec file:
const states: StateDefinition[] = [
  {
    key: "01-lobby",
    title: "Lobby setup in seconds",
    subtitle: "Host and players join fast with teams and room status visible immediately.",
    features: [
      "Room code and share link for quick joins",
      "Team A & B rosters with live presence",
      "Host controls when the game starts",
    ],
  }
]
Each state seeds the application and then Playwright captures both desktop and mobile views.
The spec programmatically:
- Starts browser
- Injects session
- Navigates to room
- Waits for UI
- Captes screenshot
This allows fully deterministic demo scenes.
Step 2 - Rendering Styled Slides with HTML Canvas
Instead of stitching raw screenshots, I render a full branded slide using Playwright itself.
The spec dynamically generates an HTML layout including:
- Gradient background
- Title & subtitle
- Feature list
- Desktop mock frame
- Mobile phone frame
- Logos
- Typography
- Spacing
Playwright then screen records the composed slide, not just the app.
This means:
- Perfect layout
- No video editor required
- Consistent branding
- Easy updates
Each slide is rendered at 1920×1080:
const context = await browser.newContext({
  viewport: { width: 1920, height: 1080 },
});
Step 3 - Generating a Video Manifest
Once slides are created, the spec builds an FFmpeg concat manifest.
Each slide gets a duration:
manifestLines.push(`file '${slidePath}'`);
manifestLines.push(`duration ${SLIDE_DURATION_SECONDS}`);
This allows precise timing without manual editing.
Step 4 - Rendering the Video with FFmpeg
After Playwright captures the slides, a Node script uses FFmpeg to generate the final video.
The script:
- Reads slide durations
- Calculates total runtime
- Trims audio to match
- Fades audio out at end
- Exports MP4
Example from the render script:
const filter = `[1:a]atrim=start=19,asetpts=PTS-STARTPTS,atrim=duration=${total.toFixed(4)},afade=t=out:st=${fadeStart}:d=${effectiveFade}[a]`;This trims the soundtrack, aligns it to slide duration, and fades out smoothly.
FFmpeg then combines everything:
"-c:v", "libx264",
"-crf", "20",
"-c:a", "aac",
"-movflags", "+faststart",
Result:
- High quality MP4
- Optimised for web
- Smooth playback
- Fast start for social platforms
Step 5 - npm Scripts for Automation
Everything is wrapped in simple npm scripts:
"demo:video:capture": "playwright test e2e/demo-video.spec.ts --project=chromium",
"demo:video:render": "node scripts/render-demo-video.mjs",
"demo:video": "npm run demo:video:capture && npm run demo:video:render",
"demo:video:mobile:capture": "PLAYWRIGHT_CHROMIUM_USE_HEADLESS_SHELL=0 playwright test e2e/demo-video-mobile.spec.ts --project=chromium",
"demo:video:mobile:render": "node scripts/render-demo-video.mjs --mobile",
"demo:video:mobile": "npm run demo:video:mobile:capture && npm run demo:video:mobile:render"
Now generating a demo video is literally:
npm run demo:video
or
npm run demo:video:mobile
Two Video Variants
This approach made it easy to generate:
Desktop + Mobile Demo
- Full feature slides
- Rich captions
- Logos
- Perfect for website
Social Media Reel Version
- Portrait format
- Less text
- Faster pacing
- Instagram / TikTok ready
No manual editing required - just different specs.
Why This Approach Is Powerful
This workflow gives you:
- Fully automated demo videos
- Pixel-perfect consistency
- Repeatable builds
- Version-controlled demos
- No video editing software
- Easy localisation
- Easy feature updates
Every time SyntaxRush changes, I can regenerate the demo video in seconds.
When This Is Useful
This technique works great for:
- SaaS product demos
- App walkthroughs
- Feature announcements
- Landing page videos
- Social media reels
- Release previews
- Documentation videos
Final Thoughts
Playwright isn’t just for testing.
It can be used as a powerful content generation tool.
By combining:
- Playwright
- HTML layouts
- Mocked application state
- FFmpeg
- npm scripts
You can build a fully automated demo video pipeline.
No screen recording.
No editing timeline.
No manual work.
Just:
npm run demo:video
…and your marketing video is ready.
If you’re building apps and want consistent demo videos, this approach is a huge time saver.
Comments ()